

React Native is a powerful framework used to build Android and iOS applications. There are certain practices React developers can implement to make their applications significantly faster.
In this post, we would like to present some useful tips which can vastly improve the efficiency of your app.
Table of content
- Prevent costly re-renders
- Use <FlatList>, <SectionList>, <VirtualizedList> instead of <ListView>, <ScrollView>
- Remember to upgrade React Native to the newest version
- Reduce Application Size
- Optimize your images
1. Prevent costly re-renders
By default, React re-renders the entire virtual DOM subtree whenever the state or properties of a component change. If you want to avoid the unnecessary and expensive re-renderings and at the same time optimize the app’s performance, try the following practices.
shouldComponentUpdate()
The method is performed before the render() method when the component’s state or properties change.
By default, the method returns true and always enables you to render components. Returning false allows to prevent the component from updating/ re-rendering.
shouldComponentUpdate (nextProps) {
const didSomePropChange =
nextProps.someProp !== this.props.someProp
return didSomePropChange
}
React.PureComponent
To avoid having to write the shouldComponentUpdate () method yourself, you can use the React.PureComponent class for each component in which, with the same properties and states, the render method gives the same result.
Unlike the React.Component class, it offers by default the method shouldComponentUpdate (), which performs a shallow comparison of the properties and states of the component. Note that a shallow comparison of a deeply nested object will only check the reference, not the values of the object.
The following entries work in exactly the same way:
class MyComponent extends React.PureComponent {
// some code
}
class MyComponent extends React.Component {
shouldComponentUpdate(nextProps) {
if(this.props.someProp === nextProps.someProp) {
return false;
}
return true;
}
}
React.memo()
Another good practice preventing unnecessary rendering of a component is the use of the higher-order component React.memo(). It’s similar to React.PureComponent but for function components instead of classes. If a functional component with the same properties always renders the same structure, you can wrap it in React.memo for better performance. This means React will skip rendering of this component and use its latest rendered version instead.
const MyComponent = ({text}) => <Text>{text}</Text>;
MyComponent.propTypes = {
text: PropTypes.string.isRequired
};
export default React.memo(MyComponent);
React.memo, like PureComponent, only performs a shallow comparison. If you want to use your own comparison method, you must pass the appropriate function as the second argument.
const areEqual(prevProps, nextProps) {
// some code
}
export default React.memo(MyComponent, areEqual);
The useCallback hook
Starting from version 0.59, you can access React Hooks, allowing access to the status and other functions without having to write classes. The hook useCallback is a great way to prevent unnecessary re-renderings.
const ComponentContainer = ({selectedLocation, navigation}) => {
const goToSelectedLocation = useCallback(() => {
if (!selectedLocation) {
return
}
navigation.navigate('DeliveryLocation')
}, [selectedLocation])
return (
<Button
goToSelectedLocation={goToSelectedLocation}/>
)
}
In the above example, useCallback remembers the function and rebuilds it only when one of the specified dependencies is changed (in this case it’s selectedLocation. The hook is especially useful when passing callback functions to optimized subcomponents, preventing them from unnecessary re-renders (of the Button component in this case).
2. Use <FlatList>, <SectionList>, <VirtualizedList> instead of <ListView>, <ScrollView>
ListView rendering is slow, so it’s better to use lists that use less memory for better performance:
- FlatList
- SectionList (expands FlatList with additional section headers).
- Virtualized List (should be used only if you need to work on nonstandard data not supported by FlatList)
In addition, they provide a very large number of features such as: Pull to refresh, Horizontal mode, Scroll loading, Header / Footer Support and many more.
These components accept and require two main props: data and renderItem
The first property date is an array of data, each element of which is list item data. The second prop – renderItem – takes one item from the source and returns a formatted component to render.
Of course there are many other properties / methods of these lists. Refer to the official React Native documentation for more details and use examples.
<FlatList
data={
[
{ id: 1, title: 'Harry Potter' },
{ id: 2, title: 'The Lord of the Rings' }
]
}
renderItem={({ item }) =>
<BookItem title={item.title} />}
/>
3. Remember to upgrade React Native to the newest version
The creators of React Native and the community are constantly optimizing its operation and performance. Make sure you regularly update your project to the latest version of RN.
For example, version 0.61 includes a new method of reloading called Fast Refresh and the new JavaScript engine Hermes – a small and lightweight JS engine optimized for Android. This engine improves performance, reduces memory usage and the size of downloaded files, and the application itself also runs faster than in previous versions. It is a great solution for devices with limited memory and low computing power, thanks to which the application runs smoothly even on low-end phones.
4. Reduce Application Size
To reduce the size of your application, use the Android App Bundle! (only for Android applications).
It’s a file publishing format allowing to prepare the appropriate APK versions optimized for various devices and distribute them through Google Play Store. Specific devices will receive a different version of the APK depending on the features e.g. processor or screen resolution. React Native provides a large number of native libraries that are not needed in all devices, e.g. 64 bit devices do not require 32 bit libraries.
According to the official React Native documentation, to create an application (APK file) we use the command: ./gradlew assembleRelease
The command will generate the application in the folder android/app/build/outputs/apk/release/app-release.apk
If you want to try Android App Bundle, simply replace the above command with the command: ./gradlew bundleRelease A file with the extension .aab will be generated at: android/app/build/outputs/bundle/release/app.aab.
This is the file you need to send to the Google Play Store.
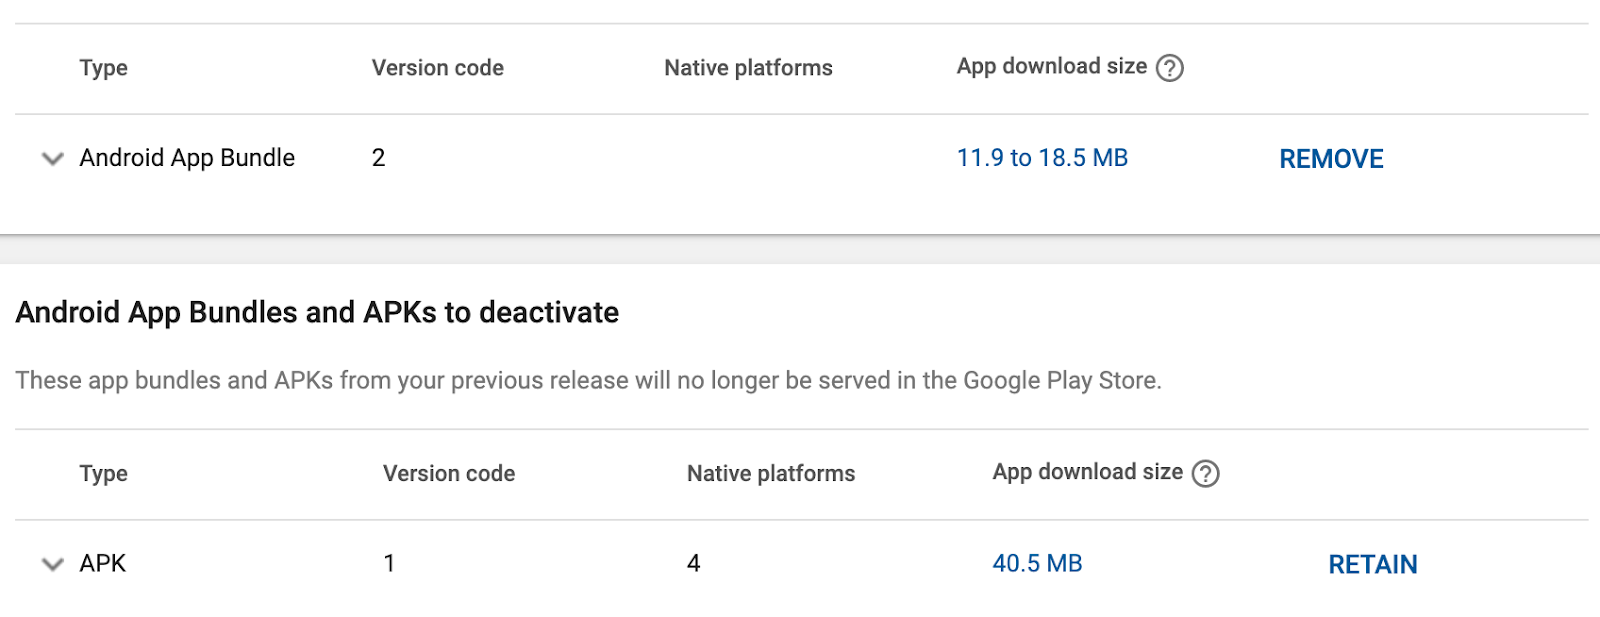
As demonstrated in the picture above, the application generated in the Android App Bundle format is several times smaller than the one in the .apk format! It took just one command.
Of course, the size of the application can also be reduced by minimizing the number of external libraries or compressing the assets that the application uses. More on that in the section below.
5. Optimize your images
Always use the smallest possible image size. The larger the files, the longer they will take to transfer and display on the screen. Use image resizing software to compress the image. Remember to find a compromise between the quality and size of the photo. To compress photos you can use software such as: https://www.photoshop.com, https://trimage.org, http://imageoptim.com, https://imageresizer.com/compress-images and many others available on market.
Image Size and Suffixes(@2x, @3x)
You can also use the suffixes @2x and @3x, which will be displayed depending on the screen resolution of your device.
e.g. logo@2x.png will be used on iPhone 7 while logo@3x.png will be displayed on iPhone 7 Plus. If the image sizes do not match the screen of your device, the best option will be selected.
Loading Static Assets
When loading assets from the JavaScript package, React Native first imports the file and then sends it to UILayer (which is responsible for drawing the interface). If your assets are located in the default Native React folders, Native will simply tell you to render the specific asset via UILayer.
Assets in iOS package
You can add assets in an existing directory – Images.xcassets, or create a new directory in Xcode: File -> New -> File -> Asset Catalog (Resource section) – you can choose a name.
When the directory is added, make sure it is added to Build Phases -> Copy Bundle Resources.
Once you select the catalog, you can add assets via drag & drop or by clicking the button with the plus icon.
Assets in Android package
Add photos to the drawable folder in the project: android/app/src/main/res/drawable
For assets added in this way, declare Image component and set source uri (string) matching the name of the previously added file. Don’t use the file extension!
<Image
style={{ height: 100, width: 100 }}
source={{ uri: 'my_icon' }}
/>
We hope the simple tips presented in this post will significantly increase the performance of your application. The result will be increased speed and fluidity – the founding blocks of a successful app and a growing number of users.


